360 Integration Relius Setup
Last updated: October 2, 2026
The Finch 360 integration lets you send contribution rate changes back to the payroll provider. At a high level:
The custom report you add to Relius Reporting generates the output file in the format Finch requires.
You set up an STP task group to run that report automatically.
A custom task renames the generated file to the format that Finch requires
The STP task group uploads the renamed file to the 360 subdirectory on the same Finch-owned SFTP server used for the 180 integration.
The output is a .csv file in the following format:

Each output file contains records for a single plan. The STP job is set up to generate a separate file per plan rather than combining multiple plans into one file.
Note: This article uses ABC123 as an example Plan ID and ABC100 as an example Relius client ID. They show up in different places below (the client ID identifies your Relius environment; the Plan ID identifies one plan). Replace each with your own value where indicated.
How the custom report determines the RateEffectiveDate
The custom report you add later in these directions applies this logic to determine the date that populates the “effective date” field, RateEffectiveDate:
If you allow enrollment prior to plan entry, a participant can have a contribution effective date before they're eligible to defer.
If the participant hasn't met the entry requirements, the report uses the projected entry date.
If the participant has met the entry requirements but the entry date is blank, the report uses the projected entry date. Example: if the participant met the requirements on 7/15 and entry is the first of each month, the entry date is 8/1
If an eligibility transaction was not posted on or after 8/1, the entry date will not be populated.
If the plan entry date is prior to the contribution rate change effective date, the custom report uses the contribution change date
Recommendation: If you're not already running projected entry dates via STP, set up a task group to generate projected entry dates.
Set up a Plan Group
Set up a Plan Group and add every plan that will send contribution rate change files back to Finch. Without a Plan Group, you'd have to run the report across all plans, which can take significantly longer.
Create the Required Folders
Create the following folders:
Payroll_360 folder under your FINCH payroll folder, containing a PROCESSED subfolder.
BATCH folder under your Q Drive. Don't use an underscore or other special character in this folder name.
Note: If you already have a folder that holds .BAT files used in STP, you don't need to create a new one for the BATCH.
DO NOT put spaces in folder names.
Rename the generated report files to match Finch's format
Finch requires the file name to include only a Plan ID and a date, in either order, and nothing else unique to the file. Relius generates the report file with extra information built into the name, so this task sets up a process to rename the generated file down to just what Finch requires. It uses the BATCH folder you created in task 2.
Confirm your global report output naming convention
Review the report output naming convention default settings for the Plan Group you'll use for this integration. The order of the plan id and date stamp does not matter.
Report Writer Reports > File > Output Naming Convention
Confirm the naming convention includes a Plan ID and a date/time stamp. Either can come first.
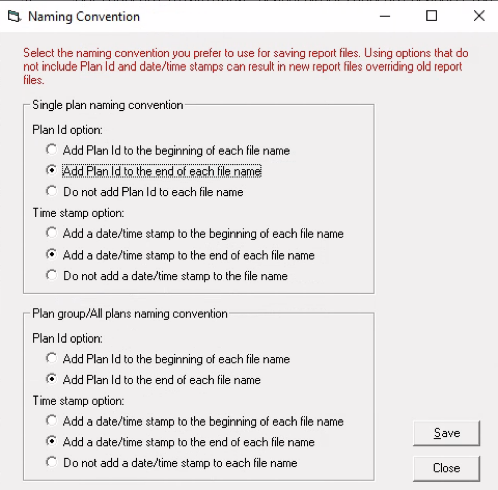
NOTE: If "Do not add Plan Id to each file name" is currently selected, you'll need to change it to include the Plan ID and discuss the impact internally.
Changing this option will change the report naming convention for all users, including any reports run via STP.
Create the FinchRename.bat File
This script in the .bat file strips the file name down to the required format for Finch's system:
Open NotePad in the ASP environment.
Copy the script below with two modifications
Replace the placeholder ABC100 with your Relius client id.
Replace the place holder FINCH with your Finch\Payroll_360 folder.
e.g. FINCH -> FinchPayroll
Save the file to the BATCH folder you created above.
File name:
FinchRename.batDon't use an underscore or other special characters in the file name.
@echo off
setlocal enabledelayedexpansion
:: Loop through all .txt files in the folder (change *.csv to match your files)
for %%F in (\\pdc1wwraradap02\ABC100\FINCH\Payroll_360\*.csv) do (
set "filename=%%~nF"
set "ext=%%~xF"
:: Remove the last 11 characters from the filename (e.g., "_144746_001")
set "newname=!filename:~0,-11!"
:: Rename the file
ren "%%F" "!newname!!ext!"
)
endlocall
Add the custom contribution changes report to the Custom node in Relius Reporting
Finch emails you the FINCH_360_Contr_Chgs report file (for example,
FINCH_360_Contr_Chgs_v3.rpt). The version number in the file name changes as Finch updates the report, so always use the most recent file Finch sent you rather than a specific version number.Copy the report file Finch emailed you to your Custom Report folder.
Go to Relius > Reporting > Report Writer Reports.
Highlight Custom.
Select File > New > Report.
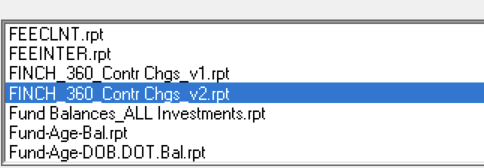
Select the FINCH_360_Contr_Chgs report file.
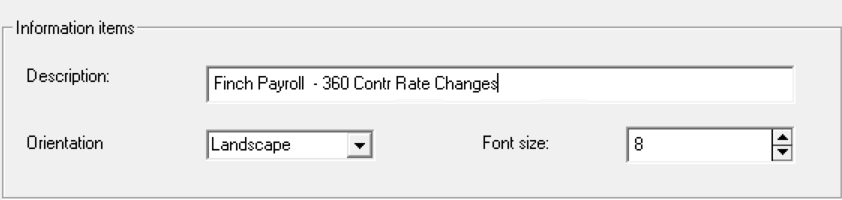
Enter a Description for the report
Click Add.
TEST: Run the report manually to test the output. Select a plan or plan group that has contribution rate changes entered via the web, and run the report for a date range to include those requests.
Add a custom task to run FinchRename.bat
This task requires the FinchRename.bat file you created above.
Relius main menu: STP >Task Scheduler > File > Custom Tasks
Click on the PLUS sign to add a custom task
Short Name: Limit = 15 Characters
Program Name: FULL file path to the BATCH folder:
\\pdc1wwraradap02\ABC100\Batch\FinchRename.BAT
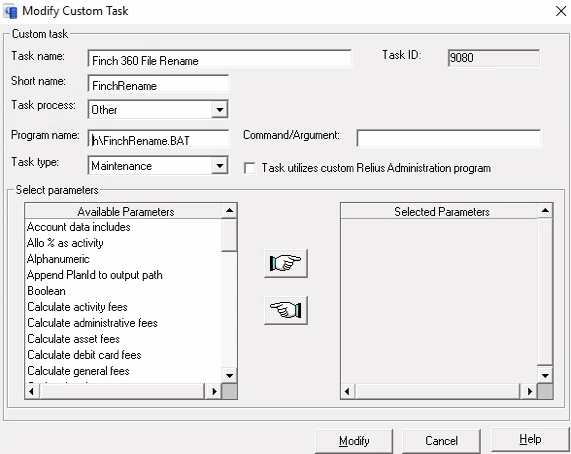
Test the custom task to rename the file
Create a file in NotePad with the word TEST
Save the file:
name:
deferral_ABC123_2026-08-10_140987_001.csvfile path:
pdc1wwraradap02\ABC100\FINCH\Payroll_360\Reminder that ABC100 is a placeholder for your Relius Client ID.
Choose the file type All Files (will make it so .csv is not counted as characters in the file name)
Create a new task group named: TEST – Custom Rename.
In the task scheduler, click the green + button
Select add new group
Add the Finch File Rename task to the task group.
Save the task group
Open the Job Queue STP > Job Queue
Click on the PLUS sign to add a job to the Job Queue
Add the TEST – Custom Rename task group to the job queue
Check if the jobs runs as successful or errors
If the job runs as “Successful”
Go to the FINCH\Payroll_360 folder
Verify that the file named:
deferral_ABC123_2026-08-10_140987_001.csvis nowdeferral_ABC123_2026-08-10.csv
If the job runs as “Errors”
The Output will not show information related to the error.
Check the Custom task to make sure that the Program name is correct
Copy the Program name to NotePad to verify
Check to make sure that the program name FinchRename.bat is in the BATCH folder
Verify that there are no special characters in the file path or file name.
Some systems my require a command prompt. /c (this has to be a lower case c
Create a copy of the FTP file transfer task group
We are using the same Finch SFTP server and credentials that are used for the 180 file delivery. You can create a new one from scratch if you have saved the public and private key files, instead of copying the existing one. These directions are to make a copy of the existing task group so that you do not have to find and upload those public and private key files.
Open the Relius STP task group that was set up in STEP 5, item 1 of the Finch Relius setup guide.
Relius > STP > Task Scheduler:
Double click on the task group: Finch - SFTP Payroll Transfer (yours may be named differently) to open the Task Group.
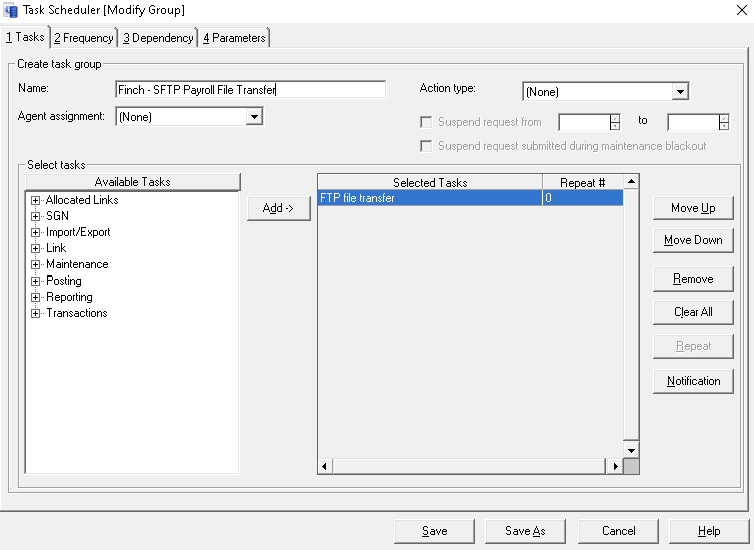
Select Save As option (bottom right) - this is the command that makes a copy.
In the Task group name box, enter the name for the new task group. Something such as Finch - 360 payroll deferral changes
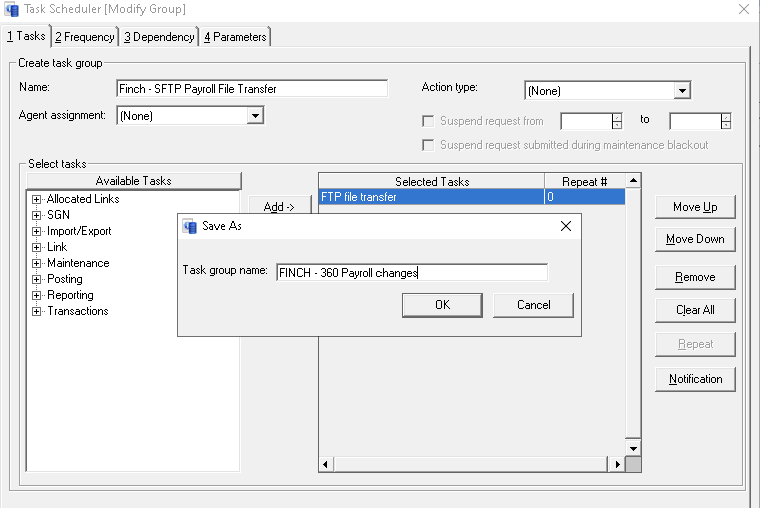
This shows naming the new task group (copy) Click OK.
Add the following tasks to the NEW Task Group (created in step 1)
Create Single Report
File move/copy
Finch File Rename (name of the customer task setup above).
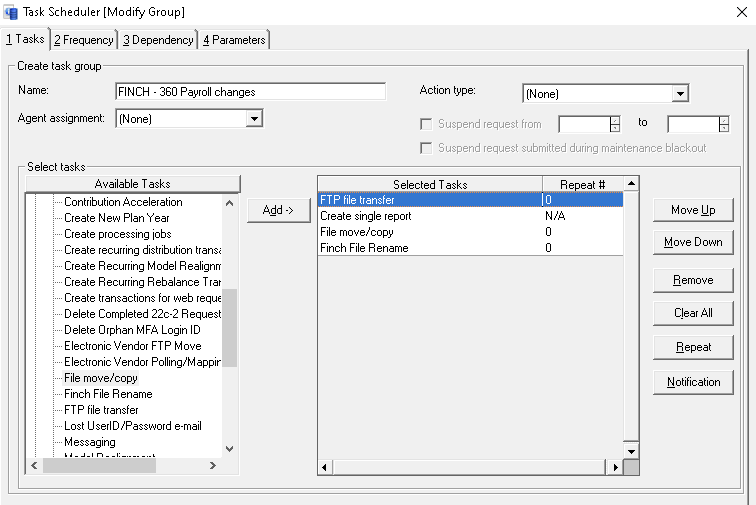
This shows the three tasks added. Click of the FTP file transfer task under Selected Tasks
Click on "Move Down" until this task is the last task in the list:
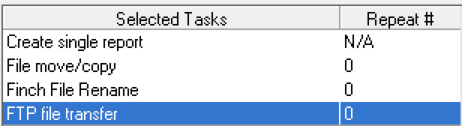
This shows moving the FTP File transfer task to the bottom of the list. Set the Task Parameters for the 4 selected tasks
Create Single Report Parameters
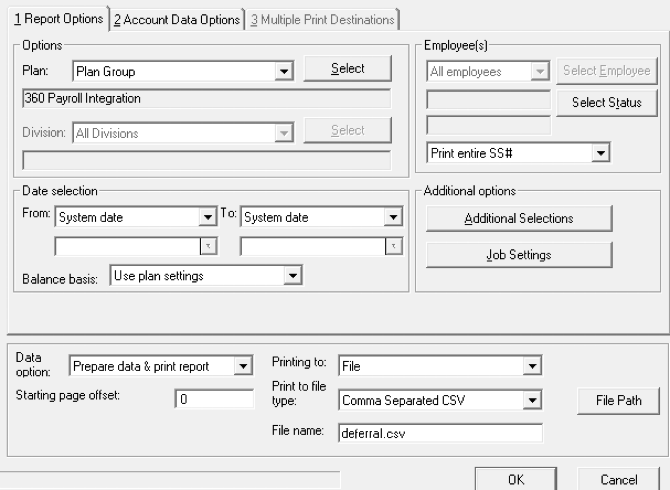
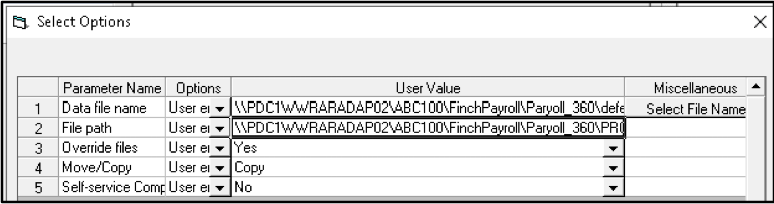
File move/copy - creates a copy of the original file in the Payroll_360\PROCESSED folder (or what you named it).
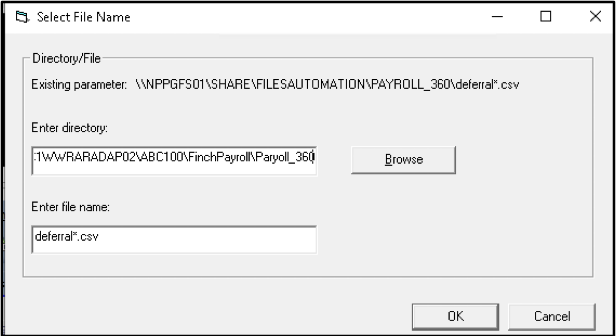
Miscellaneous > Select File Name Finch File Rename - custom file rename task. No parameters for this task.
FTP File Transfer
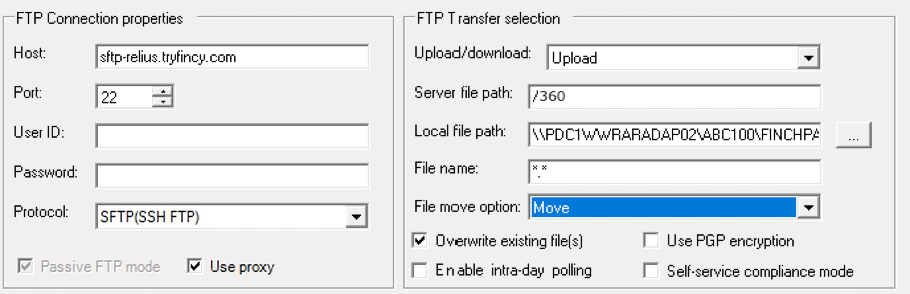
Modify: Upload\Download option to Upload
Local file path: The folder the custom report task used to save the .csv files
File move option: Move
Relius deferral report reads changes written to the plan E contra PCT table. It includes changes made through the web or Client Services workflow, as well as changes staff enter directly in Relius, such as processing a form. Although Relius tracks the source of each change, this report is not filtered to exclude manually entered updates.