Workday - Reauthenticate an Integration System User (Org + Payroll)
Last updated: November 18, 2026
NOTE: These directions are for an existing Finch Workday connection that needs to be reauthenticated. To set up a new Finch Workday connection, follow these directions.
Before You Start
Please make sure you have the following before you begin:
Administrator privileges in Workday. The person completing the reauthentication must be a Workday Administrator.
The username and password for your existing Integration System User (ISU). This is the system user your organization created when you first connected Workday to your application through Finch. If you don't know the password, or it has expired, follow Step 2 below to reset it.
Overview: What You'll Need
When you open the reauthentication link, Finch Connect will show you the same instructions used to set up a new connection. You do not need to create a new Integration System User or Security Group. Anywhere Finch Connect asks you to create one, simply confirm that the one you created previously still exists and has the correct permissions (see Step 3).
You'll only need to collect and paste the following values into Finch Connect:
Your Workday Tenant ID
Your existing Integration System User's username and password
Your Web Services Endpoint URL
Step 1: Retrieve the Workday Tenant ID
Log into your Workday account
Find your Tenant ID in your web browser's URL:
If the URL looks like
https://impl.workday.com/somecompany, your Tenant ID issomecompanyIf the URL looks like
https://somecompany.workday.com, your Tenant ID issomecompany
Paste your Tenant ID into Finch Connect
Step 2: Confirm Your Integration System User Credentials
2.1 Find the username
If you don't have the username on hand, it was typically created using the first 3 letters of your company name followed by "Support" (for example, ABCD Company → ABCSupport). It is also listed as a member of the Finch security group in Workday.
Paste the username into Finch Connect.
2.2 Reset the password (only if needed)
If you already know the password, skip to 2.3. Otherwise:
In the search bar at the top of the page, search for "Maintain Password for Integration System User" and click on the resulting task
Select your existing Integration System User
Enter a new password that meets your security requirements. Make sure the password does not contain any of the following characters:
&,",>Make sure Require New Password at Next Sign In is not checked
Click OK to save
Paste the password into Finch Connect, and keep a secure record of it for future reference.
2.3 Exempt the system user from password expiration
This step is required to keep your connection active. If the system user is not exempt, Workday will continue to expire its password, and your connection will need to be reauthenticated again.
In the search bar at the top of the page, search for "Maintain Password Rules"

Add your Integration System User to System Users exempt from password expiration
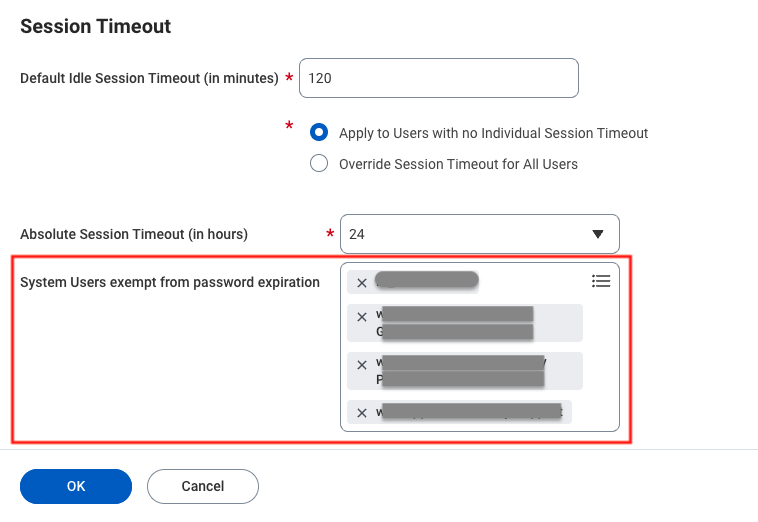
Click OK to save
Step 3: Confirm Your Existing Security Setup
You do not need to create anything new here. As you click through Finch Connect, confirm each of the following is still in place, using the new connection guide as a reference:
Security Group: The Finch security group still exists and your Integration System User is assigned to it
Domain Security Policy Permissions: The Finch security group has all required permissions set to Get Only (View Only will not work)
Authentication Policy: The Finch security group is assigned to an authentication policy that allows User Name Password (or Any)
If you changed anything above, make sure to activate your changes by running "Activate Pending Security Policy Changes" and/or "Activate Pending Authentication Policy Changes" in Workday.
In Finch Connect, check the boxes to confirm you've completed each of these steps.
Step 4: Retrieve the Web Services Endpoint URL
In the search bar at the top of the page, search for "Public Web Services" and click on the resulting task

Scroll down to find Human Resources (Public) in the Web Service column, and hover over it to reveal the
...menuIn the
...menu, click Web Service > View WSDL. A new page will open with the technical specifications for the Workday Human Resources Web Service
Scroll to the bottom of the page and find the line containing
soapbind:address location=. You can also use Ctrl+F or Cmd+F to search for it
Copy the URL up to (but not including)
/service. Your Web Services Endpoint URL should look something likehttps://wd5-services1.myworkday.com/ccx
Paste the URL into Finch Connect and click Connect