Paycom — Deduction Mapping Guide
Last updated: November 9, 2026
This guide covers how to map deduction codes in Finch for Paycom.
Complete this for every net new connection. Deduction mapping is done on a per-client (per-connection) basis. Each Paycom connection has its own employer-defined deduction codes, so you'll repeat this mapping for each connection you set up.
Overview
In Paycom, employers define their own unique set of deduction codes. These codes are arbitrary and company-specific.
Because of this, Finch has no reliable way to know which Paycom deduction code corresponds to which benefit without additional verification. The deduction mapping you provide bridges that gap: it tells Finch which code(s) make up each benefit, and how the amount should be interpreted (a dollar amount or a percentage).
Without this mapping Finch cannot return enrollment data for a Paycom benefit, and cannot create or update enrollments (deduction writes) for it. The mapping is what makes the automated connection usable.
What's automated for Paycom today: medical (ICHRA) deductions on existing enrollments — enroll, update amount, and unenroll. Creating new benefits, updating deduction descriptions, 401(k) / Roth, and company-sponsored plan types are not automated and return a clear error. See Known limitations below.
Before you begin
Dashboard access. You'll complete the mapping in the Finch Dashboard, under the connection's benefits configuration. Make sure the person doing the mapping has access to that connection.
Know your codes. Only the employer truly knows how their deduction codes are grouped. Have the list of the employer's Paycom deduction codes and what each one represents on hand. If you're mapping on behalf of an employer customer, confirm any ambiguous groupings with them rather than guessing.
Don't know the codes? Send a Payroll Mapping Link. If you don't have the employer's code list, you can send them a Payroll Mapping Link from the dashboard so they can complete the mapping themselves (see Map each benefit below).
Paycom personnel access form (PAF) must be off. If the employer has PAF turned on in Paycom, Finch can't write deductions — in either assisted or automated. Finch Connect warns the employer about this at connect; make sure the setting is disabled before relying on deduction writes.
Scope. Mapping applies to benefits that already exist in Paycom for the employer. Benefits newly created through Finch do not require this mapping.
Responsibilities
Task | Owner |
|---|---|
Mapping each Paycom deduction code to the right Finch benefit | You |
Grouping related codes and marking dollar vs. percentage | You |
Confirming groupings when the correct grouping is ambiguous | You — Finch will reach out if unsure |
Creating new benefits / deduction codes in Paycom (not automated) | The employer, in Paycom |
Turning off the personnel access form (PAF) in Paycom | The employer |
Enabling automated processing and the technical setup | Finch |
Keeping existing benefit IDs stable | Finch |
How to map your deduction codes
One-time setup
Step A — Set up your labels
In the Finch Dashboard, go to Settings and create a label for each benefit you want Finch to read and write (for example
Medical).Each label shows up as its own row in the connection's Payroll Mapping tab (the Label column). The label is the name that benefit carries in Finch; it does not rename anything in Paycom.
Step B — Call Get All Deductions once
Open the connection and go to the API Explorer tab.

Call
Get All Deductions.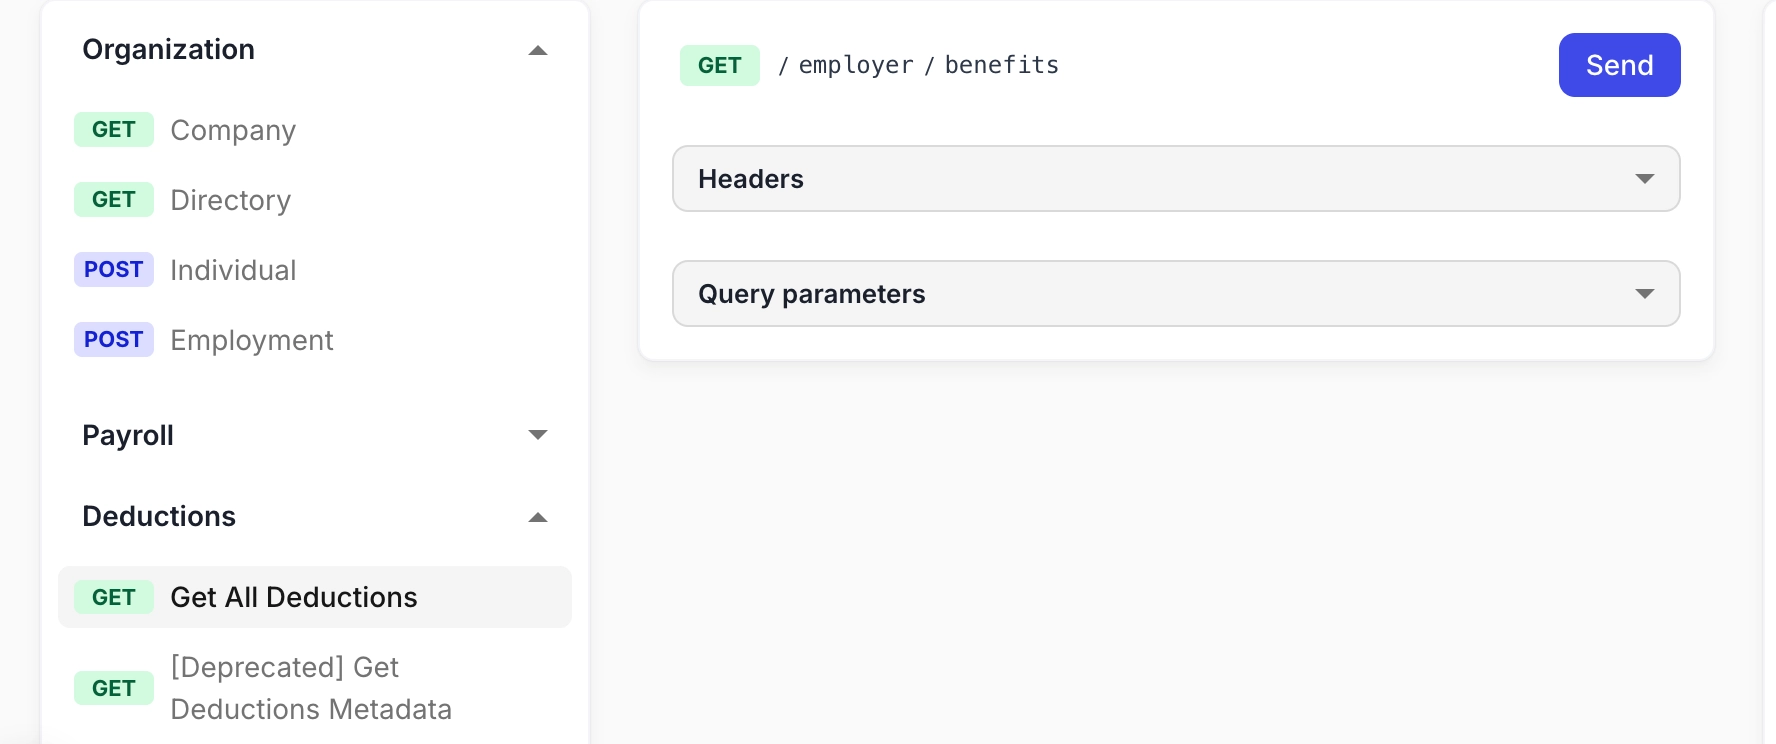
You'll get back an empty array (
[]). This is expected. It doesn't mean you missed a step or that the employer has no deductions. Finch only returns benefits once they're mapped, and you haven't mapped anything yet. Behind the scenes, this call pulls the employer's deduction codes from Paycom so they can show up in the Payroll Mapping dropdowns. The call itself can take a while to respond.Check that the codes loaded. Go to the Payroll Mapping tab, click + Add Payroll Code on any row, and open the code dropdown.
You see the employer's Paycom codes: you're ready to map.
The dropdown is empty: wait a few minutes, refresh the page, and check again. Loading codes from Paycom isn't always instant.
Still empty after waiting and refreshing: contact your Finch contact. Don't keep calling
Get All Deductions.
Grouping rules and examples
Multiple Paycom codes can map to a single Finch benefit. If one logical benefit is carried on more than one code (for example a flat-dollar code and a percentage code for the same plan), group them into one Finch benefit.
Health deductions map as ICHRA, even when the code doesn't say so. Finch only supports ICHRA for Paycom health deductions. A code named something like
MD26can still be the employer's ICHRA medical benefit (for example, sent ass125_medical). Confirm with the employer if it isn't clear.Only map what's automated. Codes for 401(k) / Roth and company-sponsored plan types aren't automated for Paycom yet, and writes against them return an error. Check with your Finch contact before mapping them.
Codes are company-specific. Don't assume a code from one employer means the same thing at another. Map each connection against that employer's actual codes.
When in doubt, confirm. If it's unclear whether two codes belong to the same benefit, check with the employer before grouping them. A wrong grouping produces wrong or missing enrollment data.
Map each benefit
Go to the connection's Payroll Mapping tab. Each row is one of your labels.

Leave the "Payroll Items" column empty. It isn't used for deduction mapping. All deduction mapping happens in the Payroll Code column.
For each label row:
Pick the benefit type. In the Payroll Code column, open Select benefit type and choose the Finch benefit type for this label (for example
s125_medical).Add the Paycom deduction code. Click + Add Payroll Code. Choose how the amount is expressed (Flat Dollar or Percent), then pick the Paycom deduction code from the dropdown.
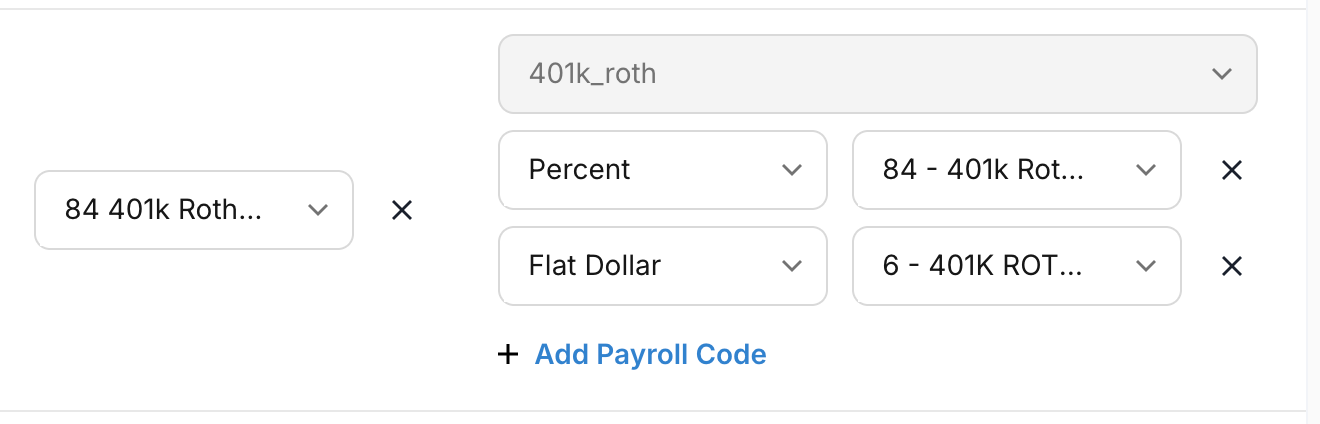
If you don't know what the benefit codes are, you can "Send a Payroll Mapping Link" to your client so they can map it themselves. The link will route them to the client version of the dashboard!
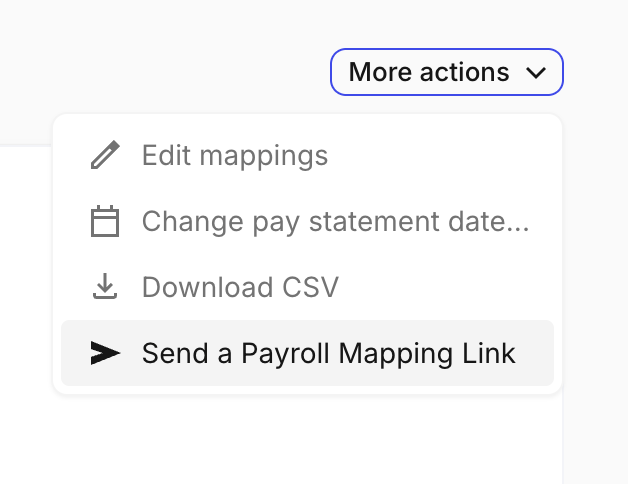
Add any related codes. If one benefit uses more than one Paycom code, click + Add Payroll Code again under the same row for each one.
Save the mapping. This is a one-time setup per benefit; once a benefit is mapped, you don't need to redo it.
Confirm the mapping
Go back to API Explorer and call
Get All Deductionsagain.Your mapped benefits should now appear. This is not always immediate. If a benefit is missing, wait a bit and call again before changing the mapping.
After mapping: how to validate and what changes
Validation
Pull benefits and enrollments for a connection you've mapped, and confirm the enrolled individuals and amounts match what you know to be true in Paycom.
Important — empty does not always mean zero. If a benefit is left unmapped, or a code is mapped incorrectly, its enrollment data comes back empty rather than as an error. So an empty enrollment response is not proof that nobody is enrolled — it can also signal a mapping gap.
Send a test deduction. After mapping, send a test enrollment and confirm it lands on the employee's record in Paycom.
If a benefit you expect to be populated comes back empty, revisit its mapping first. If the mapping looks correct but data is still missing, contact Finch.
What changes
Your benefit IDs do not change. Finch keeps your existing benefit IDs intact. Any integration logic keyed on a benefit's ID will keep working, you don't need to remap anything on your end.
Benefit descriptions may change. Once automated processing begins, Finch derives each benefit's description from the underlying Paycom deduction codes. A benefit that previously displayed as, say, "Medical" may show as a code-derived string. If you surface benefit descriptions to your end users, expect this change — and prefer the benefit's type or ID over the description string for any display or routing logic.
Known limitations
Automated scope is medical (ICHRA) on existing enrollments. Enroll, update amount, and unenroll are supported. Finch only supports ICHRA for Paycom health deductions.
Not automated: creating new benefits (net-new medical / dental / vision), updating deduction descriptions, 401(k) / Roth, and company-sponsored plan types. These return a clear error. New benefits start in Paycom and are then mapped here.
Personnel access form (PAF). If PAF is on in Paycom, deduction writes are not supported. The employer must disable it.
Getting help
If you hit an ambiguous grouping, an unexpected empty result after checking your mapping, or anything that doesn't match what you see in Paycom, reach out to your Finch contact. Where Finch itself is uncertain about how your codes should be grouped, we'll come to you rather than guessing.
Quick reference checklist
Confirm dashboard access to each connection being mapped
Confirm the employer has the personnel access form (PAF) turned off in Paycom
Gather the employer's Paycom deduction codes and what each represents
Create a label in Settings for each benefit
Call
Get All Deductionsonce (an empty[]response is expected) and confirm Paycom codes appear in the Payroll Mapping dropdownFor each label: pick the benefit type in Payroll Code, then + Add Payroll Code for each Paycom code (dollar / percent), grouping related codes. Leave Payroll Items empty
Save each mapping (one-time per benefit)
Call
Get All Deductionsagain to confirm the mapping went through (may take a little time)Send a test deduction and verify enrollments against Paycom for a sample of benefits
Treat any unexpected empty enrollment result as a possible mapping issue
Note that benefit descriptions may now display as code-derived strings; benefit IDs are unchanged